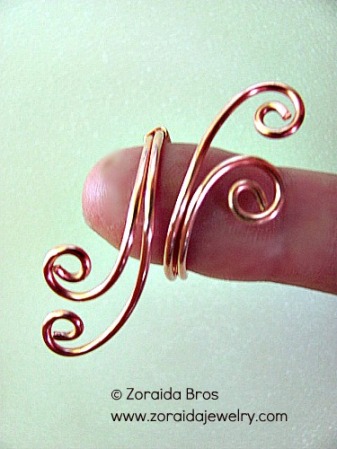
This adjustable spiral ring is quite easy to make with just a little wire, a bit of muscle and a few standard tools. 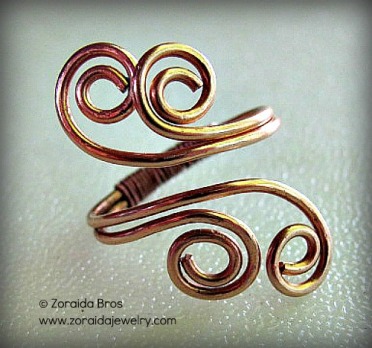
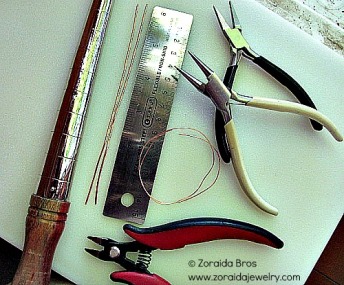
Supplies – Two 6 inch pieces of round, soft, 16 gauge wire
One 14 (or more) inch piece of 24 inch, round, soft wire
Ring mandrel or other round object ¾” to 1 inch in diameter
Round nose pliers
Flat nose pliers
Wire cutter for thick wire
Ruler
Rubber, plastic, rawhide mallet (optional).
Steps –
1. Cut 2 pieces of 16 gauge, round wire to 6 inches and flush cut the ends, straighten the wire a little bit.
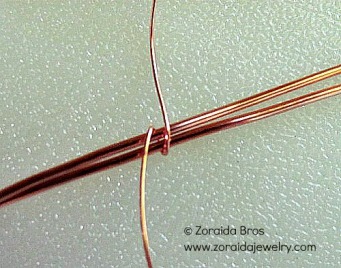
2. Cut at least 14 inches of 24 gauge, round wire, more if you want the wrapping
to cover more of the back of the ring. Cut the ends of the 24 gauge wire and tuck them
in neatly on the inside of the ring. Make sure there are no sharp ends sticking out.
3. Keeping the bundle of wire parallel, wrap the whole thing around a ring mandrel.
Slightly bend the two top wires up in a soft curve and the two bottom wires down
in the same way. Take the ring off the mandrel and separate the wires just a bit so you can make the spirals.
4. Cut about ¼ inch from the INNER wire at the top so that the two top wires are
different lengths. Cut the OUTER wire at the bottom section 1/4”. This can be
reversed if you want the wires facing a different direction.
6. Make a tiny hoop with the tip of your round nose pliers at the end of each wire and begin a spiral. One spiral should be higher than the other at each end of the wires. You can make the spirals tighter or open as you wish. I use the flat nose pliers to hold the spirals while tightening and enlarging them.
7. Put the ring back on the mandrel and squeeze it against the mandrel flattening the
Spirals so they curve gently, but firmly. You can use a rubber or other soft mallet
all around the ring at this point.
That’s it, your ring is finished! You can oxidize it and seal it if you like. You could seal it as it is, bright and shiny or whatever else you like – perhaps a patina?
You could make this ring in just about any metal as long as you can manipulate it easily.




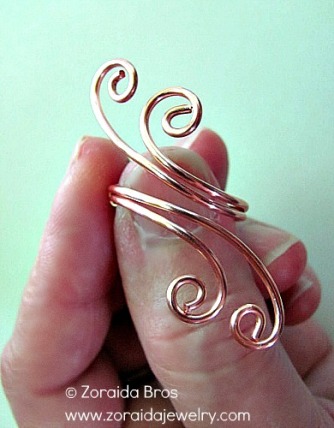


Great tutorial! I don’t know anything about jewelry, but I understood your clear, easy to understand instructions with great photos! ^_~
Thanks so much for the comment!!!
I am a beginner and I’ve found this tutorial to be very helpful.
Thanks!
Thank you Rubina! I’m happy you found it helpful. Thanks for letting me know 🙂
Zoraida, you have the best tutorials. A great tutorial and so easy to follow your instructions. Thank you
Thank you Donna. That’s a great compliment!
So pretty and feminine, very nice 🙂
Thank you Julia. I decided to write the tutorial after a customer purchased a similar ring right off my finger.
Makes you scared to wear jewelry lol 🙂
Fantastic tutorial Zoraida! I have a hard time finding rings that fit me perfectly, I’m always on the look out for adjustable and elastic rings. This one is perfect 🙂 I’ve been trying for quite a while now to perfect an adjustable ring, and here it is!
Thank you Rose! I hope you find it easy to make. I wear one of these all the time so when my fingers are swollen, they still fit! Feel free to let me know how it goes.
It was very easy! I tried it out in a bronze colored wire and it looks fantastic! Thanks so much for the idea Zoraida! I want to try it out in sterling silver next 🙂
You are a natural teacher — clear, concise directions and the pictures make it so easy to see exactly what you’re talking about. I haven’t done much metal work but I think I’ll give this a try. 🙂
Thanks so much Sally! I tried very hard to make it clear and easy so I’m thrilled that you thought so too. Let me know if you try this.
Another wonderful tutorial that will make beginners happy! I will feature it in a future post! Thanks for sharing.
Thank you so much, Pearl!! I hope it’s clear and easy.
Thank you so much for sharing, Zoraida!!
I’m new to wire jewelry and your blog is just wonderful! Love your tutorials and your pieces of jewelry as well. Keep up the good work!
Thank you, MlleMarine for the wonderful compliment. I’m glad you found my tutorials useful!
I’m always looking at the work of others, not to copy but to be inspired by them. You do suck a nice job in your creating and your tutorials are easy to follow. Thanks for the inspiration that you give to me.
Thank you Angie. I am very flattered! We all get inspired by the work of others. There’s always a new idea or technique to keep us growing.
Pingback: tutoriale handmade Cum sa faci un inel ajustabil
Pingback: PinLaVie... Make your pins come true – Easy Adjustable Spiral Ring Tutorial
Thank you so much for this tutorial. I’m a beginner with wire and this ring is perfect for me.
Warm hugs,
Ruthie
Thank you, Ruthie! Good luck with your wire work and let me know how it goes.
I’m still quite the neophyte when it comes to jewelry making and I definitely appreciate your tutorial. Question: In the list of supplies, you have the 16 gauge wire at 5 inches apiece yet in the instructions, it says 6 inches. Is it 5″ or 6″?
Thank you for taking the time to do this tutorial. As of yet, my rings don’t even come close to looking like yours! Wanna come to my house and teach me? chuckle chuckle….
Hi Cindy, I changed the supplies to 6 inches. You are right there was a discrepancy there. It really could be 5 or 6 inches depending on how many loops you want on the spirals but better to start out with a longer wire as it can always be cut. Thanks for pointing this out. Good luck with your jewelry 🙂
could this also be made into a bracelet? my fingers are full or an upper arm band?
Hi Barbara, yes, you could easily make this into a bracelet using 2, 3 or more wires. Check out the bracelets I’ve made here – http://www.zoraidajewelry.com/bracelets.html
Love, love, love your work. Just came across. I’m a novice at jewelry making and I have been trying to determine which medium I preferred since I want to make and sell. I think I want to concentrate on using wire. THANKS!!!
Thank you for stopping by. Wire is a great, incredibly versatile medium. There’s not much you can’t do with wire. Good luck with your jewelry making !
Love this ring!!! Simple but elegant. I especially love the idea of it being adjustable. Can’t wait to make one. Many years ago Avon sold a similar pattern in silver with matching earrings. Well I lost the ring!!! How does anyone lose a ring!!?@ Thanks again for the pattern.
Thank you, Karen. I’m glad you found this tutorial. You can make it out of any soft wire and use 2, 3 or more wires as well. Enjoy!
Finally made my first ring!!! Thanks so much! Am a HUGE fan of yours 🙂
Thank you Kashmira! Congratulations on your first ring 😀
Pingback: Create Your Own Adjustable Wire Rings | Brandywine Jewelry Supply Blog
Love love your ring so simple thanks for sharing I’m off to make one
Thank you, Maureen! Enjoy making some of these 🙂
Pingback: 50 DIY Jewellery Tutorials — How To Be Perfect Woman
I love this ring and look forward to making it. I also went to your bracelets page. They are so beautiful!!! Amazing work on all of them. I wanted to ask how to patina and seal the ring. Did you patina or seal the ring in the tutorial. Thank you so much for sharing this inspiring tutorial.
Hi Cheryl
Thanks so much for the compliments! To patina the cuff I would use Liver of Sulfur (LOS) which is available online and in many craft supplies stores such as Michaels. I also seal the copper with Protec A Clear – http://www.everbritecoatings.com/cart/index.php?main_page=index&cPath=7. This is the best protect that I know of to coat and seal metals. Good luck with your jewelry making and keep in touch. I’d like to know how your skills progress 😀
Thank you so much. I will try the Everbrite and LOS.
Thank you I like your design, easy to follow, now I have to do is make it and it will be fun.,
Thank you, Irene. Creating something is always enjoyable 🙂
Nice Work, I Love It! Thanks
Thank you Laurie, I hope you enjoy making these 🙂
Pingback: spiral ring tutorial | ArtspireingArtspireing
this looks very easy to do can’t wait to try it. Judith
Have fun, Judith 🙂
beautiful
Thank you Sushilla.
Nice
Thank you Ana.
zoraidabros I have been making rings wit ring blanks, oh how stupid. I am so in love with this I can’t tell you. I have only been doing jewelry for a few months, but with this I may never leave the house again, except to get supplies, ha ha. God bless you
Thank you Shirley! I’ve made several variations with this design in silver and copper. Have fun !!